Seeking an IDE. Working with MicroPython recently made me realise now, more than ever, how poorly the small board Python community is with tooling. The apparent choice of Mu editor and Thonny doesn’t come out as a great choices. That’s mainly, for me at least, because they talk to the boards ok, but the editing experience is dismal. Oddly selected keystrokes, atypical interactions, iffy window handling, very little in the way of useful syntax highlighting, almost no code navigation outside a file…. While it’s great to have open source solutions out there, it should never stop you trying to seek out something better.
Enter PyCharm
I’ve known PyCharm for ages, as part of JetBrains vast array of IDE tools. While JetBrains IDEs are packed full of features, it is a bit of a learning curve to get into. The best thing with PyCharm for makers is the community edition is free to use and thats a price you can’t beat for a well-featured IDE. But what about using it with MicroPython?
Versus the Pico W
What drove this was a need to use the MicroPython as supplied with various Pimoroni boards where the functionality is backed into the image and not available as a CircuitPython library yet.
So how do we get going. Time for a speed run.
Speeeeeeeed run!
I booted up and refreshed the Pimoroni Galactic Unicorn with the latest MicroPython from the Pimoroni crew on Github
Download and install PyCharm.
Start a new project then head to Settings and the Plugins.
In the Marketplace search for micropython and Install the result.
We’re not done here yet, now go to Languages and Frameworks in Settings and expand that. Select MicroPython there too.
Click on Enable Micropython Support (This enables it for just this project)…
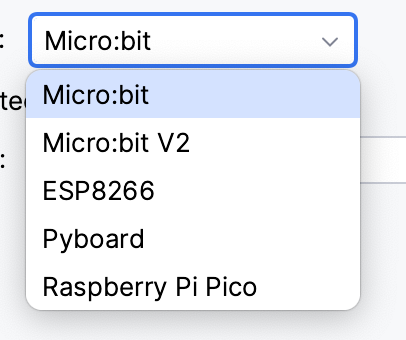
Now, pick your device:

I picked Pico - don’t worry about the lack of Esp32 on the list, apparently the Esp8266 setting will stand in fine.
Select autodetect serial port and see how that goes.
Close settings. You’ll probably be prompted to install missing MicroPython packages. Install them.
Ok, we’re nearly there. You’ll need to view the project files and right click on the project. Somewhere in that menu you’ll see:

Thats a run option that’ll flash your code over and run it.
Let’s run it… you likely have PyCharm’s simple Hello World in the editor so….
You’ll see a lower pane open in PyCharm and it’ll upload files and reboot the board.
Look for the MicroPython logo in left of the pane. Click that and then select the Repl tab to interact with the board… Type Control-D into the Repl to restart things. You should see the Hello World /Hi, PyCharm message.
Now you don’t want to be doing that clicking every time, so your’s next stop is head back to the configuration settings and you’ll find a “Start the Repl after success” checkbox. Check that and after an upload, you’ll be straight into the Repl. Hit Control-D to reload and off you go.
With it configured for the project it also copies all the code over so things are much more together.
Wrapping up…
What about library packages I hear you say. Well, that’s to be explored but now MicroPython is coming with a package installer on board in the form of mip things look a lot more interesting there.
So that’s a lot more fluid and there’s PyCharm backing it up. It’s not flawless but it’s the best experience I’ve had to date.